Worm Farming for Beginners
Worm Farming for Beginners
Worm farming is also easy to do if you have limited space like a balcony or under your kitchen sink, or if you want to produce your own natural fertilizer down in the basement.
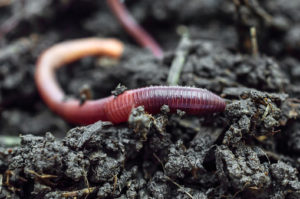
Many people think that earthworms are wriggly and slimy and are just plain gross, but in fact, they produce the black gold that you need for a thriving garden of food!
Worm farms are not new at all – some vermicomposting companies have been thriving for 35 years; some safari lodges have been worm farming to reduce wastage for years too.
You may not think of earthworms as important creatures, but they play a vital role in the environment. Not only do they help to break down organic matter, but they are also an essential part of the vermiculture process.
Vermiculture is the controlled cultivation of earthworms for their beneficial qualities, and even with all those fancy words, you can easily start your own worm farm at home.
Plus, it is an easy and cheap way to improve your garden!
In this article, we will discuss everything you need to know about worm farming and vermiculture.
Let’s Talk About the Worms
Here is a quick biology lesson on earthworms for you:
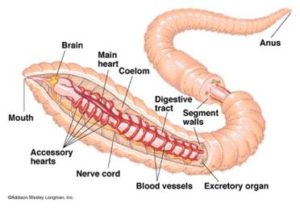
An earthworm is nothing more than a slithering digestive tract. It does not have eyes, ears, or a nose but instead, it has sensors on its body that detect movement and light.
It has a “brain” (not like ours), which is more like a cluster of nerve tissue near its one end.
It has multiple “hearts” that pump blood from an area near the front of the worm through the worm’s body.
It does not have lungs but absorbs oxygen through its skin which needs to stay wet for the oxygen to pass through. There are enough oxygen particles trapped underground between the soil particles for the earthworms to survive.
Earthworms remain underground where it is cool and dark. You will find earthworms where the soil is moist and where there is food for them. They cannot live in deserts or in cold regions where the ground is frozen.
Scientists believe there are between 2,500 to 8,000 different kinds of earthworms, most of them differing only internally.
Different Types of Worms
The largest worms in the USA are found in the Pacific North-West and grow up to 3 feet (one meter) in length.
The largest worms in the world are found in Australia and get up to 11 feet (3.4 meters long)!
But you’re not going to use either of those.
Near the surface: smaller worms live in the topsoil and feed mainly on crumbling leaves and other plant debris.
Within one foot of the surface: these worms are larger, 3 to 6 inches (8-15 cm) long and as they tunnel along underground, they fill their old burrows with castings, providing the soil with golden nutrients.
Six foot (2 meters): these worms are on average 12 inches (30.5 cm) long and tunnel almost straight down into the earth, creating permanent burrows as they go. These are often nightcrawlers as well as some related species of earthworms.
Night Crawlers
Nightcrawlers spend their days underground and after dark, they sneak out of their burrows. While keeping the end of its tail firmly anchored into its burrow, it moves around the surface in search of plants and then drags its prize down into its hole to enjoy its feast.
How Earthworms Reproduce
This information is good for you to know if you are considering starting your own worm farm – you will not have to keep buying a never-ending supply of earthworms!
Worms are hermaphrodites, which means that each earthworm has both male and female reproductive organs, which means they produce both egg and sperm cells.
In nature, earthworms mate when the ground is wet after rain. When earthworms mate, they line up head to tail and exchange sperm cells through their clitellum (a thickened section of skin about 30 segments down from the front).
This clitellum produces a ring of mucous, and then the worm backs out of the ring, depositing egg and sperm cells as it goes. The ring closes to form a cocoon that slides off the worms. The cocoon is made of a sticky secretion, and to protect the eggs, it hardens when it comes into contact with air.
Inside the cocoon, the sperm cells fertilize the egg cells. Two to three months later, depending on conditions, three to four baby worms will wriggle out from the cocoon. As soon as they are born they are able to start munching on debris!
Worms can produce several cocoons over their lifetime – in fact, one earthworm can lay up to 20,000 eggs in its lifetime!
How easy and inexpensive is this – worm farming for beginners, especially those on a budget, will find this sustainable as worms reproduce often and your supply will continue to grow and grow.
How Worms Benefit Your Soil
- They create tunnels that allow air and water to penetrate the ground more easily and reach the roots of the plants
- Worms loosen the dirt that allows plant roots to spread more easily
- While they are burrowing they are consuming dirt, insects, and other debris like decaying plant and animal matter
- Worm castings are spongy and soak up water, helping the soil to stay moist
The earthworm uses its mouth on the front end to pull food into the burrow. Inside the worm, the food is ground up and moves on to the intestine, which takes up almost the full length of the worm’s body. The worm removes the nutrients that it needs and the castings or ‘worm poo’ are passed out through the anus at the back of the body.
These castings are packed with minerals and nutrients that soil and plants can benefit from.
On average, ONE worm can deposit approximately 8 pounds (3 – 4kgs) of these castings in a year. That is a lot for one little worm!
Vermiculture is the process of using earthworms to break down organic matter and produce vermicompost, a nutrient-rich compost that can be used to improve soil quality.
How Does a Worm Farm Work?
Worm farming for beginners can be complicated if you overthink things, but once you understand the mechanics, it really is quite simple and it basically runs itself.
A worm farm uses earthworms to naturally decompose waste and turn it into nutritious fertilizer for your plants and your garden. The worm poo or worm castings correct term is vermicastings. It looks like soil and can be tricky to spot in the beginning, until you know what you are looking for.
If you have your worm farm set up in such a way to collect the run-off water, or what some people call worm ‘wee’, this can be used in your plants and garden as well, and people who use it absolutely swear by it. The correct term for this is leachate.
Earthworms are part of a group of creatures known as decomposers. There are different types of earthworms and the ones that are best to keep in your worm farm are composting worms. These worms tend to stay closer to the surface and don’t dig down as seep as some of the other earthworms that you get.
The more popular types of composting worms are red wrigglers (Eisenia fetida) and red worms (Lumbricus rubellus). They cannot survive well in ordinary garden soil but thrive in compost-rich environments where they work incredibly hard.
And don’t forget, these composting worms eat their body weight in food every day, so if you have one kilo of worms, they ill eat one kilo of food EVERY DAY!
How to Start Worm Farming
One of the best things about vermiculture is that it is actually quite simple. Once it’s set up, you really need to monitor it once a week and let the worms do the rest.
You can set up your own worm farm in just a few easy steps:
DIY Your Own Worm Farm
Making a worm farm is easy, and you have a few options available, and below I am just going to show you one of the ways.
Building your own worm farm helps to reduce organic waste, and produces precious castings that are like crumbling gold for your soil.
However, there are a few rules that need to be followed to ensure your new pets are happy and thriving.
1. Keep their homes moist, but don’t drown them
2. They enjoy living in the dark
3. Don’t overfeed them
Simple! So let’s get started.
What you need to set up your worm farm
*A container at least 8 inches/ 20 cm deep eg. plastic washtub or even a bucket
*Bedding materials: shredded newspaper, fallen leaves, peat moss, coco coir soil, or any combination of these materials
*Worms
*Plastic trash bag or similar plastic
*Kitchen scraps
Now do the following:
- Add drainage holes to the bottom of the container. The holes should be less than 1/4 inch/ 1/2 cm across, and spaced every 6 to 10 inches (15 – 25 cm).
- Fill the bin halfway with the bedding you have collected. Mix soil and several different types of bedding materials, and moisten the bedding evenly.
- Add at least a dozen worms. If you are buying worms then add one pound or half a kilogram to get started.
- Cover the mixture loosely with the plastic bag. Place the bin in a shady spot or cool cellar where curious animals won’t disturb it, and where it won’t get dried out by the sun.
Once this is done you can start to feed the worms bits of kitchen scraps. Include carrot peels, butternut pieces, chunks of pumpkin, tea bags and don’t forget the coffee grounds… they love those! It is even worth it to go down to your local coffee shop and ask them to keep a small bucket for you. They are usually more than happy to, and its free – just give them the container that you would like to have filled.
If the top of your worm farm dries out, you can mist it lightly. It honestly doesn’t take long and your worms will be multiplying and you can start feeding them more. Generally, this takes 2 – 3 months.
Over the Next Few Months
The worms will start to break down their bedding. In three to six months, depending on how many worms you have, most of the bedding will have been used up.
In its place, your bin is filling up with rich, crumbled worm compost that actually looks a lot like soil. Visually, it’s just darker.
When this happens, you can take as much as half of the vermicompost out of the bin and put it in your garden, worms and all. Or use the compost on your plants and return the worms to your bin.
Refill the bin with fresh bedding and start again!
The Most Common Problems with a New Worm Farm
1. My worm farm smells!
This is either because you have given them meat and bones to eat, which is a no-no. They don’t eat this and it will rot, causing a stink, and will attract rats, mice, and even dogs.
Alternatively, you could be feeding them too much and they aren’t eating it fast enough so the food is rotting. If this is the case, feed them less.
Remove dead worms and rotting food from your worm farm.
2. Gnats in my worm farm
This means that there is too much moisture in your worm farm. Don’t dry it out completely because the worms need the moisture to be able to ‘breathe’ through their skin. Remove the lid if you have one and let the top layer dry out a bit.
If the soil is relatively dry on the top, try to reduce the amount of food you are giving them.
Alternatively, add some carbon pieces on the top of your worm farm to cover the smell and absorb the moisture content.
Worm farming is also easy to do if you have limited space like a balcony or under your kitchen sink, or if you want to produce your own natural fertilizer down in the basement.
Many people think that earthworms are wriggly and slimy and are just plain gross, but in fact, they produce the black gold that you need for a thriving garden of food!
Worm farms are not new at all – some vermicomposting companies have been thriving for 35 years; some safari lodges have been worm farming to reduce wastage for years too.
You may not think of earthworms as important creatures, but they play a vital role in the environment. Not only do they help to break down organic matter, but they are also an essential part of the vermiculture process.
Vermiculture is the controlled cultivation of earthworms for their beneficial qualities, and even with all those fancy words, you can easily start your own worm farm at home.
Plus, it is an easy and cheap way to improve your garden!